watervole: (Default)

 I've recently moved on from the basic and double-faced tablet weaving patterns that I've been doing for the last few years, along with inkle woven patterns, to the fiendishly difficult 3/1 twill tablet woven patterns.

I've finally got to the point where I can weave them with a reasonably degree of accuracy..

That took many weeks of swearing, undoing (where possible) starting all over again,etc.  But I've now got the technique and my ability to read the patterns and check each row as I do it at a reasonable speed.  ie. Slow, but not nearly as slow as when I started!

In this kind of weaving, you're effectively setting every thread individually on every line.

But, the results do look very nice.  

If you look at this video, you can get a rough idea of what is possible.


I've only tried weaving images 15 pixels across so far, some use 30 cards or more, but I'd really love an excuse to weave some of the larger and even more complex images.

The catch is finding someone who needs such a thing!

One of the best known historical items is the stole of St Donat

I suspect this replica took an awful lot of work!

Hence, do you know anyone who has a use for a really complex and wide woven band?

Narrow bands - less than 20 cards if the warp is fine, or less than that if the warp is thicker make good belts and straps as they are very strong.  narrow bands can also be used to decorate clothing on the end of sleeves, or on hems, or round necklines, etc.

My test twill band will become another hairband for Oswin.

But wide bands with patterns that don't repeat are essentially decorative items, unless you're creating something to be worn for ceremonial purposes.

So, does anyone need a stole or similar for such a purpose?  (Normally, I give away everything I weave, but for something this complex and time-consuming I would actually want some payment)


(If you want a simple belt woven, just ask!)


watervole: (knitting)

 I'm just about to make my first attempt at weaving a 3/1 twill.   This is supposed to be horribly difficult, but some of the designs are so beautiful!

If, like me, you had no idea what a twill is, then I shall explain:

Most weaving goes under and over alternating warp threads.  Twills go over 3 and under 1.  Hence 3/1 twill. (You can also have 2/1 twill and other variations)

Denim is  a twill. The twill weave is what makes it very flexible fabric.


I've got an excellent book on tablet woven twill by a German woman called Claudia Wollny.

I learnt about her through one of those 'small world' moments.

Back in those dim and distant pre-lockdown days, we were having a meal at the cafe at an RSPB reserve near us.  All the outside tables were full and we could see people looking for somewhere to eat - so we invited two of them to use the free seats at our table.

We got chatting and I discovered that one of the couple shared my passion for table-weaving.  Within minutes we were deep  a conversation that was probably completely incomprehensible to everyone else and looking up photos on the internet to show each other what we'd made.

It was her that introduced me to twill and Claudia Wollny.

Having just finished two inkle hairbands for my granddaughter (she's starting a new school, so in school colours), I decided I wanted to go for the twill (the hairbands barely took a day each, from first thought to wearing them)


I've had the book for far too long, just drooling over it.  I've warped the loom, so cross your fingers for me!

You can't block turn the cards for twill, every pair has to be done independently....

inkle woven hairband


If anyone is interested in basic tablet weaving (which can be done very cheaply indeed as long as you have a pack of playing cards, a hole punch, a ruler, and some spare yarn), then the video below is a very clear explanation of how to warp the cards for a simple pattern.


watervole: (Default)
 This entry is mainly so that anyone else attempting this pattern will have a chance of finding all the information about it. It's a lovely pattern, but a absolute pig to weave!


The reason it is so difficult is because it's a pattern with deliberate missing threads in the warp.  Most tablet weaving uses four threads, one in each corner of the card, but this is a pattern that only uses two of the four holes.  It gives a slightly three dimensional look to the weave as there are small pits as part of the pattern.  It's a style known as Hochdorf weaving after an archaeological find in Germany. (some people call it pebble weaving, because it looks a little as though pebbles of  a different colour are showing through the weave, but this tem 

I fell in love with the pattern when I saw a photo of it, but would never have managed to weave it without this page .  Not only does it have a diagram on how to turn the cards, it has a trouble-shooting guide to help you recover when you go wrong!  And boy, did I need that guide!  I only wish I could thank the author, but sadly, comments are disabled.

Why is it so difficult to weave?

The short answer is tension.  When you have a warp thread in all four holes, the cards stay where you put them.  If you have warp threads through two diagonally opposite corners, the cards want to be diagonal too.  This is not too bad if you're working on a warping board where the cards tend to rest level on the board, but I was working on an inkle loom, where the cards are suspended in the air.  Every time you let go of a card, it flips to the diagonal and you lose your place in the pattern.

After much swearing, I eventually resorted to using stitch holder pins to pin the cards together through the corner holes.  This stopped them flipping and also made it easier to turn the card bock.  After that, I still made occasional mistakes, but far, far fewer than before.
If you look at the photo of the cards on the loom below, you'll see that each pack (there are three at this particular point in the pattern) has it's own pin.


If anyone is insane enough to weave it, and knows how to do tablet weaving, the pattern chart is below.  The letters on the RH edge of the lower diagram indicate which hole is at the top back at the end of each pair of turns.  It's the same hole right across the pack - this simple fact will be a lifesaver if you go for it, as it allows you to check your position regularly.


watervole: (Default)
I finally figured out how to get my photo from Flickr to appear here.
As you'll probably notice, it gets neater as you go down it. I started on a backstrap loom, made a fair number of mistakes, abandoned it for a while when its original purpose became obsolete, bought a cheap inkle loom, finished it off and was very pleased with the even tension and increased ease of weaving (and far less back ache) achieved on the inkle loom.

20180812_232457


I
 was so happy with the final result that I promptly started a new project (see below).  This was a relatively simple pattern.  I wanted to take advantage of some sparkly yarn I had, so I used that against a darker background. I don't think you can see the sparkle in the photo. 
I won't be buying any more of the yarn. It's easy to use and I had it to hand, but sparkle is non-biodegradable plastic...  However, I shall use up what I have.  (I thinking about ways of using recycled yarn in the long term, but I've several balls to use up first.  The dark yarn in this was old left-over wool I'd inherited.) 
I'm pleased with the way the little bells worked.  They were left over from an old morris school project.  Because the warp threads twist around the weft, they grip it very firmly.  Hence, an inch or so on each side, threaded through the bell's loop is all that is needed to secure the bell to the hat band. Yes, it's another morris hatband...  Not sure who is going to get it yet.  I'll offer it to my son's fiancee and see if she likes it.  

He proposed to her a month or two ago, and I'm very pleased that C said 'yes'.  He loves her from the bottom of his heart and she's a lovely person.

The whole project was very fast. It probably took as long to plan it and to warp the loom, as it did to actually weave it. About three days in all.

Lesson learnt: continuous warping is easier when you don't have a border of a different colour...  You have to start knotting bits together and it's a bit of a pain.


watervole: (Default)
 I've been tablet weaving again.

For some reason, I can't get the photo on Flickr to show here, but I've put a link  for those who would like to see the design.

This particular pattern has an interesting history.  Originally found by archaeologists, it was several years before anyone figured out how to reproduce it.  Normal tablet weaving patterns change on horizontal lines (across the width of the piece), but this one changes on the diagonal.

The trick is to change one pair of cards on each side of the centre line, every two picks, working your way outwards (or inwards) until you reach the edge (or centre).

I started this pattern working on a backstrap loom as I've always done in the past, but I've been getting back ache from this kind of loom, so having found a cheap (but perfectly servicable) inkle loom at Sidmouth folk festival, I transferred the weaving to that.

You probably won't be able to spot the change in the photo, but the tension along the edges was noticeably better on the loom.  and I found it easier to correct mistakes there as well (mistakes in tablet weaving are difficult to correct at the best of times, and virtually impossible at the worst)

I'd originally been intending to make a glasses case out of this band, but having found a case at another festival that did exactly what I needed, and did it better than the design I had in mind, I abandoned the project for some time.  When I came back, it was very difficult to pick up the pattern again and I ended up doing and undoing the first inch several times over.

The moral turns out to be that you should leave yourself a note saying which side of the loom you were doing the pattern changes on....

The narrowing in at the end was done by turning warp threads into weft threads and then cutting them off at the edge.  The loop at the top was there from the start - I used continuous warping to originally set up the pattern.

I eventually braided the end and finished it off with one of those useful things you learn in Guides.  The whole band is now gracing the hat of Anonymous Morris's accordion player.


watervole: (Default)
I like to carry my reading glasses in a small pouch on a cord over my shoulder.  Reduces the rate at which I lose them...

The old embroidered pouch is totally worn out, so I'm aiming to tablet weave a new one.

 This post is partly making notes for myself so that I don't forget what I'm doing...

On the last tablet weaving project I did using cotton yarn, four cards worth of yarn led to 1cm width in the final result.

Therefore, I need 28 cards to make a glasses pouch 7 cm wide.

The case needs a length of 15.5cm  x 2 (front and back), so 31cm, plus about 34cm wastage at the ends (turning space for the cards, shed for the shuttle, knotting onto holder, twist space, etc.)

That means I need 65cm for each warp thread and a total of 28 x 4 = 112 warp threads.

I'm going to attempt a pattern style called 'Egyptian diamonds', which is a two colour pattern plus a warp-twined border.  So, that will be 4 cards (with 4 warp threads each) for the warp twined border (black), leaving 96 cards of pattern. Half of 96 is 48, so in total, I'll need 48 magenta and 48 + 16 = 54 black.

I'm not sure if anyone other than La Avispa will follow all that, but see my earlier posts on tablet weaving if you want to know how to do it.

The aim, is to make a diamond pattern, but with rounded corners rather than sharp angles.

I'm going to try threading the tablets a different way this time.  I'll take photos for La Avispa.  If it works, it may save her some effort on future projects.
watervole: (Default)
 This video shows how to do double-faced tablet weaving. It's a harder to learn technique, but very versatile once you've mastered it.

You may want to click on the closed caption box if the sound is poor.  I've done a full set of subtitles.


I wasn't clear enough in the video about the card-turning sequence. Each 'square' on your chart requires two turns of the cards in the SAME direction - with a pass of the shuttle for each turn. Thus, there is an ongoing 2 forward, 2 backwards turning sequence throughout the weaving. This has the advantage of greatly reducing the amount of twist building up in the warp threads.


Here's my new shuttle that Alex Holden made for me.  I thought it was very good value for £10 including postage.  (I'm happy to supply his contact details if you want your  own) You may notice in the video that I've adapted my weaving style, now I have shuttle and beater combined in one.


Here's the pattern I used for my space invaders hat band; (the bottom two on the left were the ones I chose, but you could use any combination)


and here's how it came out:


Single threaded version above - alternately threaded version below


I'm very pleased with the result.

watervole: (Default)
 I've done the video, but the sound quality (as always) is very poor, so I'm adding subtitles. It's a slow process, but I'm half way through.

When I finally get there, you'll be able to weave anything from space invaders to alphabets (provided you buy/design the pattern you desire).
watervole: (Default)
 CAB completed here first weave.

She cheerfully confesses that the first set of vertical stripes were an accident, but nicely mirrored them at the end, so you'd never know.


She mentioned that her back was aching a bit. There are several ways of helping with this.  One is to anchor the weaving to a clamp on the table rather than your waist.  It gives you less control over the tension, but does mean you aren't looking down so much.

If the far end of the weaving is higher than your waist, even up to head height, this definitely helps as you don't have to bend over so much.  Also, consider ways of starting the actual weaving several inches away from your waist so that you don't have to look down so far. 

I'll do a future post on tablet weaving looms.  I haven't tried on yet, but I'm thinking about it. There are two main styles, neither is terribly expensive and both are fairly easy for anyone with a bit of woodworking skill to make themselves.

(I'm working on  a 'double-faced' tablet weave this week.  I'm trying to get past the initial  mistakes before I post anything about it.)

watervole: (Judith)
Look at what la avispa has done with her latest belt - she's woven it straight onto a buckle, which is a brilliant idea.
P1012663.JPG

The tablet weaving I've shown you so far had all the cards threaded the same way at the start.  It didn't matter which way, as long as they were all the same - though if you flipped some of the cards part way through, you effectively reversed the threading direction.

Now, I'm going to show you a simple repeating pattern in which the cards are threaded diffently from the start.

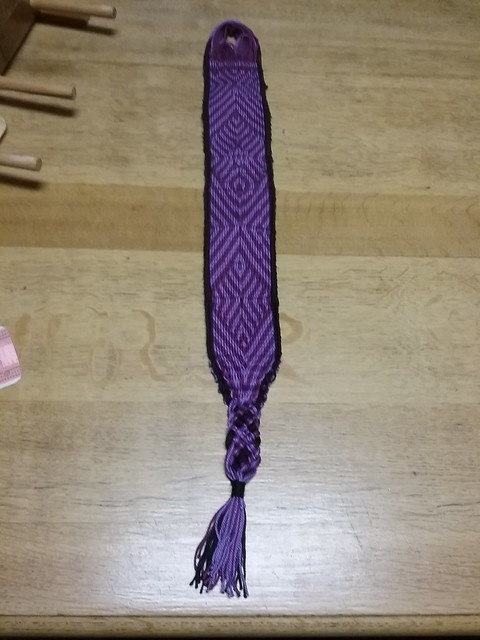
If you look at the hatband below (modelled by my lovely husband), you'll see that the 'stitch' direction is symmetrical across the middle of the band and that 's due to the cards being threaded in opposite directions.

You'll also notice, if you look carefully, a 'v' patter along each edge.  This is known as a 'warp-twined border' and gives a neat edge that helps the completed band to lie flat.


Now, we have to introduce a few technical terms:

Looking at the diagram below, you'll see the letters ABCD down one side.  These letters represent holes in an individual card.  The numbers represent the number of the card in the pack.

DSC00674DSC00552
Remember this playing card from way back at the beginning of my tablet weaving discussions?  If we look at the chart, we can see that for this pattern, card 4 has black thread in hole A, white in hole B, black in hole C and white in hole D. (In my case, black and white became purple and lilac)  there are a total of 40 dark and 24 light threads (4 x 16 in total)

Some people label the holes clockwise, some anticlockwise.  Most times it won't make any difference as the pattern will just come out reversed and you're pretty much bound to reverse the direction sometime during the weaving in any case, (but if you're doing a really complicated pattern from a chart, you may want to check.)


Now, you may have noticed the little arrows below the chart.  These are important and potentially very confusing.


Here, we have to talk about S and Z threading.

Imagine you have the cards all threaded and the warp threads tied to your belt ready to start weaving, now, visualise one of the cards.  The threads will enter a hole on one side of the card and come out the other side.  Look down on your cards from above and think of the direction of the central stroke in a capital S and Z and compare with the slant of the thread in the diagram.
The left-hand card is S-threaded and the right hand card is Z-threaded.

Some people use the terms left and right when talking about threading directions. I find this incredibly confusing as it all depends on how you visualise the terms.  (I visualised them the opposite way to the writer of the first book I read and I still rely on my pencil notes in the margin of the book to remember what she actually means.)

I suggest you convert all references to right and left threading to S-threading and Z-threading.

An arrow -> like card 1 in the threading diagram will be called left to right, but is acutally Z-threaded.

An arrow on a threading diagram like <- in the diagram above for cards 2-8, often refered to as being threaded right to left is actually S-threaded.

You'll notice that the edge card is threaded the opposite way to the one next to it. That's how you do the warp-twined border.

To carry out this pattern, you simply thread the cards, start turning the pack forward, and keep turning it forward with a shuttle pass on every turn.  When you've either got the length you desire, or have too much twist to carry on (more likely the latter), then change direction and turn backwards until you have as much twist as you can handle, etc.

The warp-twined border will look after itself.

NOTE - in patterns with frequent changes of direction, the warp-twined border will need different handling.  I'll deal with this when I move onto double-faced weaving.  Double-faced weaving is not suitable for a first project in tablet-weaving, but it is very versatile and can be used to weave anything from space invaders to alphabets.

NOW- why not try either the pattern above, or play with some squared paper and see what designs you can come up with yourself.  You can use as many different colours as you like and you can use any width of band (within reason), but you only have four rows to create your pattern in.
watervole: (Default)
I'm getting questions from people starting on second projects - which is great!

A very common way of getting a neat edge on tablet  weaving, especially when you're doing patterns with a lot of warp floats, is to do a warp-twined border.

Warp floats (basically a double length stitch)  happen every time you change the direction that the cards are being turned and they can look messy when they occur along the edge.

 A warp-twined border is two cards at each edge that end up making a v-shaped pattern down each edge.  It's a nice strong edge and also helps reduce any tendency that some patterns have to twist the weaving.  The border cards are usually threaded with four threads all of the same colour, so the border is plain without any colour changes.
 
If all your cards have the back of the cards facing left (for example), then you would flip a few so that you ended up with:
 
LRLLLLLLLLLRL

In other words, flip the card that is one in from the edge.

You'll need to keep the two edge cards on both sides separate from the main pack.

The trick is to slide the edge cards away from the rest of the pack by a couple of centimetres.  Keep  both pairs the same distance away from you, but parallel to each other.

Let's assume for the sake of argument that you're doing a pattern of diamonds (which was one of the last options I showed on the mystery tablet weave).  Let's keep it  a very simple pattern of four turns forward and four turns backwards.  All the deck except the edge pairs will be turned as a block and  the main deck will be turning in a 4 forward, 4 backwards pattern.

The edge cards will follow a different pattern.  They do: "Turn forward until the warp threads are twisted enough to be a pain. Then turn backwards until the threads are twisted enough in the other direction to be a pain. Repeat."

So, a sequence of actions might be:
1.  Turn main pack forwards, turn edge cards forward (I would keep them separate from the main pack even though they are currently turning in the same direction - it reduces mistakes.)
2.  Main pack forward, edge cards forwards.
3.  Main pack forward, edge cards forwards.
4.  Main pack forward, edge cards forwards.
5.  Main pack backwards, edge cards forwards. (this is why you keep the packs separate so that you don't forget and start turning the edge cards backwards with the rest - this is the voice of experience speaking here!)
6-8 same as 5.

The other advantage of a border is that you can make it the same colour as your weft, and thus the weft become invisible at the edges.

I hope that's clear, if not, happy to answer questions as always.
watervole: (Default)
 We have a couple of completed projects now.

See la avispa  for a really lovely zig zag.  (She's got some good suggestions which are well worth reading on attaching the ends and I love her idea of attaching warp threads directly to a belt buckle)

and a diamond weave from Patsy Rose.  Patsy was the one with the idea of using plastic bag clips, and she's also improvised a clothes peg as a shuttle.

The joy of this particular loom set up is that you can get a lot of variations on the pattern with very little effort.  It's a great way of getting a good feeling for tablet weaving and the possibilities it offers.

I'll be doing a space invaders pattern soon.   That one's a lot more difficult.  It uses a similar card set up, but a different technique on the card turns.  I'm happy to post instructions and a video if people want to see it.  If you try it, expect to make some mistakes in the early part of the weave and allow extra length so you can keep going.  (Trying to undo more than one or two rows will drive you insane)

I can also post some set ups for other simple patterns if requested.

I can also explain what a warp-twined border is and why you might want to use one.  They're fairly straight-forward - and you'd need to learn that if you want to attempt the space invaders design.

watervole: (Default)
 I was going to post a video, but the focus was horrible...

At the end of your project, one of many ways of finishing it is to make a fringe.

There are several ways of making a fringe.

1.  Take small groups of warp threads (four or more, but your taste is whatever you prefer), making sure that some are from each side of the last weft thread.
Tie each group into a knot as close to the weft as possible. Make sure to include the weft thread in the knot next to the final edge.

Cut finished fringe to whatever length you desire.

2.   Take smaller groups of warp threads (two or more, but your taste is whatever you prefer), making sure that some are from each side of the last weft thread. 

Twist each group in the same direction and then twine the two groups around one  another (practice will quickly show you which direction works for this - if you do it the wrong way it will all come undone.  If you do it the right way, they will twine together like plied yarn.

Tie a knot at the bottom of the twist.

Trim ends however you like.

3. Exactly the same as method one, but you can make a second lower knot joining pairs of fringe together (and further knots lower down joining the other pair option - this ends up with a diamond pattern, but is really only suitable for wider pieces of weaving.

watervole: (Default)
  I finished my band for the Mystery Tablet Weave, so I thought I'd let you all see how it came out.
This is the bit you’ll see in the video.
This is where I started doing freeform and experimented with different pattern repeats.
I've added some subtitles to the latest video as the sound quality from my camera is pretty poor.
I haven't yet finished off the ends, which is why you can still see a plastic bag clip on the hat. I'll be showing you how to make a fringe at the end, shortly. There are many ways you can finish it off, but fringe is easy to do and makes use of the yarn left at the ends.
 
watervole: (Default)
la_avispa on Livejournal is the first one past the post.  I've seen the photo in her journal and it looks really good. She's done the pattern in turquoise and yellow.

Her tip is to use a plastic bag clip on either side of the cards when putting them away, instead of tying string around them.

A couple of people have flat edged shuttles that they're using as both shuttle and beater combined.  (I think I know where I can get one of those in a few weeks time, so I'll try that myself)  I'm worried they might be a bit lightweight as a beater, but it's certainly worth a try.
watervole: (Default)
 

You'll notice the warp threads on the far side of the cards becoming twisted.  Don't worry about this, it is normal, and we'll be doing something to unwind them later. 

After every few turns of the cards, insert your ruler in the shed on the other side of the cards  and push the twist back towards your attachment point.  This will stop the twist getting too close to your cards and making it difficult for you to move them.  You can also use the cards themselves to help most the twist away.  Sliding the deck up and down will move a lot of it and will probably mean you need to use the ruler less often.

 
watervole: (Default)
 Here’s how to fasten the pencil to a chair back or door handle.


I’d also recommend experimenting with plastic bag clips (as long as your band isn’t too wide for
the clip to handle. My cousin, Patsy Rose suggested this idea, and I like it.
I’ve used one clip to clamp all the threads, and a second clip to secure the ends wrapped around
one end of a small embroidery frame that I’m going to tuck into my belt. But you could just slide
the bag clip through your belt. (I like the embroidery frame because I can wind long pieces of
work around it, but this isn’t a long project, so you won’t need one)

How do I get all those warp threads to line up so smoothly?

The trick is to use the cards themselves as a comb. Secure one end of the warp threads
(I’d recommend the end furthest away from you) and do it with the block of cards close
to that end. Now, hold the cards loosely as a block and slide them towards you, threads
will miraculously straighten out with lovely even tension.

If you have all the dark marks on your cards facing upwards (rotate the cards in a vertical
plane until this is the case), then you will see what is in the picture below. All your dark
threads will be evenly combed on top, and all your light threads will be evenly combed
on the bottom.

I don’t expect this to take you very long, so I’m going to go away and video the first bit of actual
weaving! (Would have done it yesterday, but we had unexpected baby-sitting)
watervole: (Judith)
Here’s how to fasten the pencil to a chair back or door handle.


I’d also recommend experimenting with plastic bag clips (as long as your band isn’t too wide for
the clip to handle. My cousin, Patsy Rose suggested this idea, and I like it.
I’ve used one clip to clamp all the threads, and a second clip to secure the ends wrapped around
one end of a small embroidery frame that I’m going to tuck into my belt. But you could just slide
the bag clip through your belt. (I like the embroidery frame because I can wind long pieces of
work around it, but this isn’t a long project, so you won’t need one)

How do I get all those warp threads to line up so smoothly?

The trick is to use the cards themselves as a comb. Secure one end of the warp threads
(I’d recommend the end furthest away from you) and do it with the block of cards close
to that end. Now, hold the cards loosely as a block and slide them towards you, threads
will miraculously straighten out with lovely even tension.

If you have all the dark marks on your cards facing upwards (rotate the cards in a vertical
plane until this is the case), then you will see what is in the picture below. All your dark
threads will be evenly combed on top, and all your light threads will be evenly combed
on the bottom.

I don’t expect this to take you very long, so I’m going to go away and video the first bit of actual
weaving! (Would have done it yesterday, but we had unexpected baby-sitting)
watervole: (Judith)
Each end of our loom needs to be secured before weaving can begin.
What we are creating here is a ‘weaver tensioned loom’. This means that one end is fastened to a fixed point: the back of a chair, a door handle, a clamp, or anything else handy, and the other end is fastened to the weaver’s waist using a belt. This means that loom tension can be easily adjusted by leaning back or forwards, or by moving your chair a little.
I’m going to show several options here.
Read more... )

Overhand Knot
The knot can be tied to your door handle, back of chair, etc. just by tying a spare bit of yarn round it and tying the yarn above the knot.
Literally, just tie some yarn around the big knot and tie it to to something solid and fixed. Door handles work as long as you're pulling in the right direction, but you could wedge it into a closed window, fasten it to a hook, or whatever you like.

At the weaver end of the loom, it can be tucked through your belt. The belt will stop the knot slipping out.

DSC00592


Another option for the end away from the weaver is using weaver’s knots to attach the warp threads to a pencil.


Tie a simple knot and add a bow or half bow if you have enough yarn left.
DSC00575
See that loop of string fastened to the pencil at both ends? That’s important.

Weaver’s knots slide sideways easily - that string in a tight knot (I use a clove hitch) stops it sliding off the pencil.
(You can also use the string to loop once or twice round the top of a clamp, if you happen to be using a clamp to hold your end.)

If you go with the weaver’s knot option, make sure you have several cards worth of threads in each knot, or you’ll spread the warp threads too far apart.
watervole: (Default)
 These may come in handy for holding ends of the warp threads.  I haven't used them myself yet, but they'll certainly do for short term use and may well have the strength for the actual weaving.  I may try some experiments in a day or two.

watervole: (Default)
 I'm not halting the tablet weaving, just waiting for people to catch up.

When you've got your cards threaded, post a comment to let me know.  

My cousin Patsy suggested using a plastic bag clip rather than a knot to hold the threads at the end, and I think this is a great idea.  
watervole: (Judith)
This is the most important part of the project. Any mistakes here will be impossible to fix, so we’ll be checking and double checking everything at regular intervals.
Remember labelling your cards with a dark and light label or pen mark?
Thread two dark threads through the holes next to the dark mark, and two light threads through the holes next to the light mark.
Do this for all your cards.
It is very important that all the cards are face up and that all the threads come from the back through to the front. Look very carefully at the way the threads are visible on the face of the card.
If you look at the cards in the picture below, you’ll see that the one I’ve turned over has the threads the other way round on the back.
(Ignore the fact that I have four dark threads in this photo - stick to 2 dark and 2 light)
As you thread your cards, build them into a stack, face-up with number 1 on the top. You need to be very neat here. Keep all the threads the same length and keep the threads as straight as possible. (the threads in the stack in this photo are not nearly neat enough - I had to spend ages tidying them and it would have been much better if they’d been straight in the first place)

Before we go any further, check your deck. Make sure that all the cards are face up, and that all the threads are coming through from the back to the front. Then get someone else to check it for good luck.
If you have to leave your cards for any reason, tie some string round them. Make sure that the string separates the threads that come from each corner. This means you can pick up your project, twist the threads all in one group and protect it from getting tangled.
If you don’t tie up the cards (every single time you leave the room with an unattended spouse, child, cat, etc) you can pretty much guarantee that you’ll have to resort the entire deck when you return.
You should now have a deck of cards, each with two light and two dark threads, all the cards facing upwards, all the threads coming from the back of the card to the front. The threads should all be the same length (as near as you can manage) and lying nice and straight.
Tie the ends in a simple overhand knot (one at each end) to keep everything together. This knot may be a permanent part of your work, so keep it as near to the end as possible. Try and ensure that all threads are included in it and that the threads are even in tension between the two knots. (Getting someone to hold the first knot while you tie the second may be useful)
I’ll be giving an alternative method of securing the ends in the next post, but the knot will keep your work safe for a couple of days. I used a knot at both ends for my first tablet-weaving project and it’s easy to use.
I’m expecting some of you to stick with the knots for the whole project and some to want to try the more fiddly options.
watervole: (Default)
Today, we're going to prepare the warp threads.
Have a think about how long you'd like your weaving to be. Although the preparation for tablet weaving takes a while (especially when it's your first time), the actual weaving goes quite quickly, so extra length isn't much in the way of extra effort.
The pattern I'm going to show you is one that can be carried all the way along your band if you take that option, or can have some easy variations added in as we work along.
When you've decided how long you want your band to be, multiply that length by 1.2 and add 50cm.
The process of weaving makes the warp threads go up and down a little, so the 1.2 allows for this. There are bits at the each end of the weaving where you're fastening the warp to supports and making space for the weft. That end stuff requires the 50cm.
My band is going to be about 56cm in length (it's a hat band for one of Anonymous Morris). 56x1.2 = roughly 68cm Add another 50cm and I get 118cm.
Take your number of cards and multiply by the number of holes in each card.
In my case, that's 16 x 4. this means that I need 64 warp threads, half dark coloured and half light.
The easiest way to do this is to wrap your yarn round the backs of a couple of chairs (or anything else the correct distance apart), then cut all the threads at the same time. (Space your supports half the length of your warp and then you only need to make one cut)

Measuring the warp threads by wrapping round chairs.
 DSC00512

Cut at one end, and you have your warp threads.
If anything is unclear, just ask for help.

watervole: (Judith)
To keep your cards in order, and reduce the risk of accidents from passing toddlers, cats and helpful relatives just tidying things away, it pays to number them. That way, if anything goes wrong, you can put them back in the correct place. It’s also useful if you make a mistake during the weaving, because you can check the card order to see if that’s the cause of the problem. (When we get onto the actual weaving, feel free to show me a photo of anything that looks wrong, and I’ll help you fix it.)
Number the cards on both sides, starting with card 1. The same number goes on both sides of the card.
The card in the photo is my number 4. (It’s been used in a previous project, so it also has ABCD going clockwise around it. A lot of card weaving projects (although not this one) use the ABCD notation to control the pattern.)
DSC00552

Because this project only uses two colours, and also because I wanted to pick a pattern that was easy to do, but had interesting variations for those who want to play around a bit, I’ve used dark (black) and light (pink, because a white pen wouldn’t really show on a white card...)
Find any way you like to mark the top and bottom of the card with your dark and light colours. If the card is very shiny, you may need to use a sticky label. I cut up some address labels.
The colours on the card will make it MUCH easier to keep track of what you’re doing.
watervole: (Judith)
This entry isn't displaying well on Dreamwidth - there should be several photos behind the cut. If you can't see them all, then read the entry on Livejournal where it seems to be fine. (If the cut tag doesn't work on LJ, click on the link just above. The problem on DW seems to be propagating to some views on LJ, but the entry is here in full)

Step 1

Decide how wide you'd like your band to be.  This will determine how many playing cards you need.Read more... )Read More )There is some guesswork involved in this, as yarn thicknesses are going to vary.

However, I shall set a crude rule of thumb and say that four warp threads are probably going to be around a centimetre.

This pattern will work for any width, but I wouldn't go below 8 cards, and if you go above 24, you're really getting a bit wide for a bookmark.

The width does not affect speed of weaving (well, not much), but it does affect the set up time as you have to prepare more cards and more warp threads.

I'm going to go with 16 cards for my own example, but I'd recommend 12 for beginners.They need to be square, so use one of the cards as a cutting guide and start chopping.

DSC00498

Now, round the corners. Doesn't need to be perfect.

DSC00500

Get out your hole punch and punch a hole in each corner of every card.  Try and make the results as symmetrical as possible.  You've got more cards than you actually need, so you can afford to waste a few cutting trial holes.

DSC00501

This is what the cards should look like after you've punched your holes.

DSC00503No, (evil grin), I'm not going to tell you what you're going to do with the cards.  That will be in the next post.
watervole: (Default)
 

Here's a reminder of what you need for the mystery tablet-weaving project.  The project will assume no previous knowledge and I'll stop and take questions of help people sort out problems at any point. All are welcome to join in.  I'll post the first instructions after Easter as several interested parties are away over the long weekend.


All you need to join in is a ruler, an old pack of cards, a pencil, a bit of string, a leather belt, a hole punch, a pair of paper scissors, sewing scissors, some yarn of any dark colour (I'm using black so you can clearly see what I'm doing, but any colour will do), some light yarn (anything will do as long as it is the same thickness as the dark yarn). Optional: left over yarn that you really hate and want to use up almost invisibly (that's the black ball at the bottom in my case)  You can just as easily use your 'dark' yarn.
You won't need a whole ball of anything, or even half a ball. This is a good project for using up left over odd bits of wool. It doesn't really matter if your 'dark' yarn is half red and half navy, or if your 'light' is part pink and part yellow. As long as you like the colour combination and there's a reasonable dark/light contrast.

Collect up your bits and I'll post the first instructions after Easter is over.
Anyone can join in, and I'll try and help if you hit problems.

This project will make a woven strip suitable for a bookmark. If you want to make a longer strip for a hat band or belt, I'll explain how to do that at the start.
watervole: (Default)
 Several people expressed an interest in tablet weaving.  Rather than go through lots of technical blurb about warp-twining and the like, I thought it might be more fun to give you a try.

The great thing about tablet weaving is that the set up cost is close to zero.

So, we're going to make a book mark.  (Or if you make the warp threads longer, it can be a hat band)

I'm not going to tell you how it will come out, just follow the instructions as I add them a section at a time and watch the pattern emerge.

Gather together the following:

1. Odd bits of yarn.  The warp threads need to be pretty much the same thickness, but the weft can be anything you want to get rid of.  You can use any kind of yarn: sock yarn, double knitting, crochet thread, etc.  I'd avoid anything really fluffy, but apart from that feel free to rummage through your drawer.
I want you to have two distinct colour groups  for the warp.  For convenience in telling you what to do, I'll call them dark and light.  

'Dark' could be black. Or it could be that bit of stripy sock yarn you had left over from a project a decade ago.

'Light' could be white, or it could be a selection of pale blue and pink yarns that are too small to use for anything else.

This is about fun, not precision.  As long as you like the way your colours look together, just go with it.

The weft can be something you hate and want to get rid of.  In tablet weaving, the weft is invisible most of the time. I'm using up some black sock yarn that is impossible to knit with.

2.  A ruler.

3.   A pack of old playing cards (you can use any bits of thin cardboard, but playing cards are far less effort and work surprisingly well as their surfaces are smooth)

4. Scissors

5.  An old pencil or a six inch bit of dowel.  Two may be handy, but not essential.

6.  A belt that fits you.  Preferably a fairly stiff one.

7.  A fixed point to tie things to - could be the back of a chair, a door handle, a clamp, whatever you like really.

When three of you say you've collected your bits, I'll move onto stage 2.

Hat bands

Mar. 13th, 2016 03:47 pm
watervole: (Default)
 I've been crafting in my spare time.

Making hat bands for morris hats is a nice way of having small projects for me to try out techniques.

Here's the crochet hat band (worn by me):


And the tablet woven hat band (modelled by my husband, Richard, who isn't actually a morris man, but really looks the part):


I may post more about tablet weaving. It's an interesting technique and needs very little in the way of equipment.  Namely: a pack of playing cards, scissors, a ruler and a hole punch, plus yarn.  A strong belt, a shuttle  and a small clamp are handy, but not essential.
watervole: (Default)


My first attempt at tablet weaving.  It's a versatile technique in which you use cards (squared off old playing cards work fine) with a hole punched in each corner to take a warp thread.  The cards are stacked like a deck.  Turn the deck on it's edge, with another edges facing towards you. There's a shed (space for the shuttle) created between the wool coming from the different holes.  Top holes and bottom holes.

If you rotate the deck of cards, different coloured warp threads come to the top of  the weaving.  you can create a four element pattern that can be repeated easily either forwards or backwards.  I chose  a chevron which could also be built into crosses or diamonds.

The direction you thread the wool, either right to left or left to right, has quite an impact on how the pattern finally looks, but that's getting a bit complicated for a basic explanation.

Profile

watervole: (Default)
Judith Proctor

Syndicate

RSS Atom

Tags

Style Credit

Expand Cut Tags

No cut tags
Page generated May. 29th, 2025 03:58 am
Powered by Dreamwidth Studios