Adventures in dressmaking
Jul. 28th, 2021 08:22 pmThe patterns in the book have no seam allowance - not quite sure why - you have to add it manually when cutting the pattern out.
The process of making a top goes roughly like this:
1. Not that the pattern had a single front piece and two back pieces. See no reason for there to be two back pieces, so cut it on a fold of a fabric and end up with one front and one back.
2. Pin it and try it on.
3. Realise that the reason for having two back pieces is that you can't fit the top over your head unless you have a back opening with a fastener of some kind.
4. Not enough fabric to cut out two new back pieces, and cutting it in half would leave no seam allowance, so try one of the many options suggested in the book and decide to do a pinhole neckline at the front.
5. Pinhole neck needs bias binding. Go out and buy bias binding - have no idea if wide or narrow binding is needed. Am stupid enough to believe staff member in Hobbycraft who assures me that the wide binding I am holding in my hand will be fine.
6. Attempt bias binding - find that the thick binding can't cope with the tight curve of a pinhole neck. It sticks up at right angles from the fabric...
7. Cut the bias binding in half down the centre of the strip and read lots of stuff on the web about how to attach bias binding round curves.
8. Better result this time, The bias binding still sticks up a bit, but not nearly so far.
9, Find button in stash and make a loop with bias binding to fasten it across the pinhole. Of course, the button has to be slightly to one side of the centre, which is annoying when you look at it...
10. Decide that I'd like to add some short sleeves. There's just enough fabric left from the skirt to do it. I'd like sleeves with a sort of loose, floppy effect, so I cut them on the bias (some of the Sewing Bee sticks).
11. Sew first sleeve in inside-out.
12. It also seems a bit tight.
13. Hm. Tweak sleeve shape a bit to make as much space for the shoulder as possible.
14. Sew in both sleeves. It all looks good, but I really don't like the way the neckline looks with that button, and the sleeves are still a bit tight.
15. Ah, we forgot the missing seam allowance when cutting out the sleeves....
16. Decide to scrap the pinhole neck. Cut out a big, deep neckline. Remove all the old bias binding and apply new. Getting much better at bias binding now! It's definitely lying flatter, and pressing it properly helps even more.
17. THere are some slight wrinkles on the shoulders now - probably a result of the new neckline removing some of the tension in the fabric.
18. Some careful measurement reveals that I remembered the 'extra' seam allowance on the back panels, but not on the front. Hm. That's another reason why the sleeves feel tight - the fabric across the shoulders is a bit tight.
19. Decisions, decisions. I can either remove the sleeves altogether, or take them out and reduce the seam size as much as possible. It's sewn with a 2cm seam, so I could probably gain 1cm all round without totally destroying it....
It's a good thing that I regarded this entire exercise as a learning experiment!
I've learnt a lot about both fabric and technique. The skirt was old and well worn and the fabric was soft and slippery and very hard to pin and cut accurately.
I've gained a reasonable understanding of darts - I managed to alter the pattern correctly for my bust, and I also managed a slight change to the side shaping. I wanted it loose fitting, but with some slight shaping.
I now have an idea of how to modify patterns to alter the shape of sleeves.
I now know three different ways to apply bias binding and have a reasonable idea of which one to use where and why.
I will always check patterns to see if they include seam allowances!
I will try my next project with a slightly stiffer fabric (I've a second-hand duvet colour in a nice, bold pattern...)
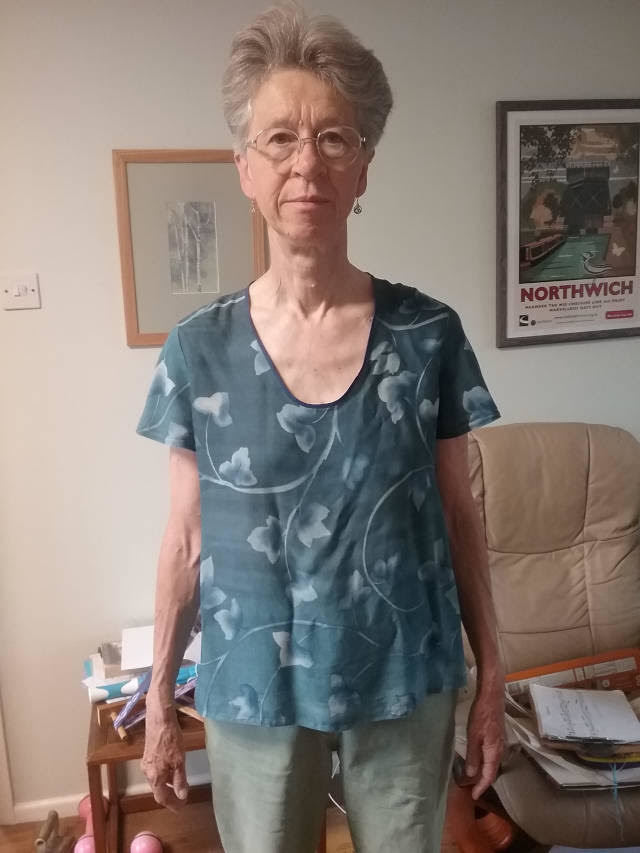
Here's what the top looks like at present - it looks a bit crumpled as I hadn't ironed it and it had got tossed in a pile by the sewing machine overnight....
So, shall I remove the sleeves, or try resetting them in with a reduced sleeve allowance?
I mean, I could just abandon it. It's never likely to fit that well, but it's all education!

How's the picture size?